|

|
| |
|
Neo Scooters Gladly Accepts |
|
   |
|
And |
|

|
|
 |
Gas Scooter Maintenance
 |
Proper scooter maintenance is crucial to getting the most
out of your scooter. The following instructions are for our Gas
Powered City
Rider and Razorback scooters sold at
neoscooters.com, however
most of the principals are universal and can be utilized on all
makes of gas scooters.
You should also consult your owners manual as certain things such
as fuel mixture or tire pressure may vary from scooter to scooter.
If the information presented here contradicts your owner manual,
then you should trust the manufacture and abide by their specs. |
Information on this page is provided on an AS-IS basis for
educational purposes only. Neo Scooters claims no liability or
warranty for any damage or injury caused directly or indirectly from
the information provided on this page.
If you have any questions regarding the maintenance of your
scooter, or have any suggestions that may help other scooter owners
please contact us via email.
Furthermore we remind scooter enthusiasts that although our gas
scooters are toys, they can be dangerous if not respected. Please
follow safe riding practices and ALWAYS wear protective gear. (See
Also - Technical Support) See
Also -
Gas Scooter Drive Trains and
Gas Scooter Engine Problems |
The following subjects are addressed in Maintenance:
-
Fuel and Oil mixture
-
Spark Plug
-
Air Filter
-
Chain
-
Tires
-
Throttle
-
Brakes
-
Carburetor
- Wiring Diagram
| Fuel and Oil mixture |
| Your scooter uses a 2 stroke
engine for power. A two stroke engine was chosen for it's excellent power to
weight ratio. A two stroke engine does not require that you ever change the
oil, however it does require that you mix a quality grade 2 stroke oil with
the gasoline prior to filling your scooters gas tank. This ensures that your
engine will remain lubricated and give you reliable service.
To accomplish
this you can buy 2 stroke oil at almost any auto parts store or hardware
store. The oil and gas are the mixed together in a separate container before
filling the scooter. The mixture should be done at a 25:1 ratio (See ratio
chart below). mixing the gas and oil too lean can cause the engine to run
too hot resulting in permanent engine damage. Mixing the gas and oil too
rich will cause decreased performance and result in a fouled
spark plug. By strictly following the 25:1 ratio
you can be assured maximum performance from your scooter.
| Gallons of Gas |
|
Ounces of 2 stroke oil |
| 1 |
5 |
| 2 |
10 1/4 |
| 3 |
15 1/2
|
| 4 |
20 1/2
|
| 5 |
25 1/2
|
|
| Spark
Plug |
|
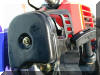
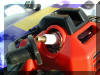 The
spark plug is a crucial and vulnerable part on your two stroke engine.
Your spark plug can be located on the top of the engine under the protective
rubber boot. Your scooter comes with a tool kit containing a spark plug
wrench for easy removal. The
spark plug is a crucial and vulnerable part on your two stroke engine.
Your spark plug can be located on the top of the engine under the protective
rubber boot. Your scooter comes with a tool kit containing a spark plug
wrench for easy removal.
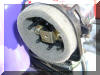
The spark plug must be clean, and must be replaced promptly when signs of
wear begin to show. The
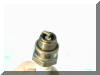 condition of the spark plug can tell you a lot about how your motor is
running. The spark plug should be a light brown or golden color like the
picture on the right. If the electrode is white, that can be a sign that
your scooter is running too hot. This can be a result of either running too
lean (See the Carburetor section), or that the
fuel and oil mixture is too lean (See the Fuel and Oil mixture section). If you are running your scooter to rich
then your spark plug may be black, covered with either gas, oil, or carbon.
condition of the spark plug can tell you a lot about how your motor is
running. The spark plug should be a light brown or golden color like the
picture on the right. If the electrode is white, that can be a sign that
your scooter is running too hot. This can be a result of either running too
lean (See the Carburetor section), or that the
fuel and oil mixture is too lean (See the Fuel and Oil mixture section). If you are running your scooter to rich
then your spark plug may be black, covered with either gas, oil, or carbon.
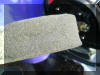
Another common problem is that the spark plug gets clogged
up with carbon and/or oil and "fouls". Th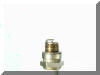 is
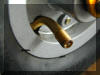
should be checked by assuring the electrode has a clean gap of .023 in. If
you are having a problem with fouling, just be sure that the gap, as shown
to the right, is clean and free of obstruction, A small piece of a fine grit
sandpaper usually works well for this. New spark plugs can be purchased from
us on our parts
page, or at almost any local hardware or auto parts store. is
should be checked by assuring the electrode has a clean gap of .023 in. If
you are having a problem with fouling, just be sure that the gap, as shown
to the right, is clean and free of obstruction, A small piece of a fine grit
sandpaper usually works well for this. New spark plugs can be purchased from
us on our parts
page, or at almost any local hardware or auto parts store.
|
| Air
Filter |
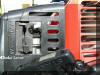
 The air filter is used to clean the air going into the engine. Periodic cleaning of this filter is recommended to protect your gas scooter engine against the damaging effects of dirt and abrasive particulates. Your air filter can be located on the front of the engine and the protective cover can be removed with one screw. (Gold screw shown to the right.) The air filter is used to clean the air going into the engine. Periodic cleaning of this filter is recommended to protect your gas scooter engine against the damaging effects of dirt and abrasive particulates. Your air filter can be located on the front of the engine and the protective cover can be removed with one screw. (Gold screw shown to the right.)
 When the protective cover is removed the air filter is revealed. You can also see the small workings of the choke and butterfly valve. When the protective cover is removed the air filter is revealed. You can also see the small workings of the choke and butterfly valve.
 The
filter should be free from dirt and grease and appear clean like the one
shown on the right. If there are contaminants on the filter it can be
cleaned in a container of gasoline. Allow the filter to dry before
re-installing it into your gas scooter. The
filter should be free from dirt and grease and appear clean like the one
shown on the right. If there are contaminants on the filter it can be
cleaned in a container of gasoline. Allow the filter to dry before
re-installing it into your gas scooter.
|
| Chain |
| The chain on your scooter should be lubricated
before every ride. The chain should also be checked for tightness on a
regular basis. If the chain is too loose a popping sound can be heard and
the scooter will jerk under acceleration, or the chain will just jump off
altogether.. If the chain is too tight it will be noisy and bind, this can
be felt by pushing the scooter with the motor off.
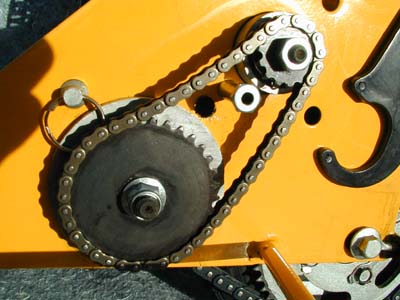 On the 22.5cc scooter there is a chain driven gear reduction
which must also be lubricated before each ride. This gear reduction chain
does is not adjustable and must be replaced when when an unacceptable amount
of slack is present. On the 22.5cc scooter there is a chain driven gear reduction
which must also be lubricated before each ride. This gear reduction chain
does is not adjustable and must be replaced when when an unacceptable amount
of slack is present.
 Access for lubrication can easily be obtained through a small lubrication hole on the top of the chain guard. Access for lubrication can easily be obtained through a small lubrication hole on the top of the chain guard.
|
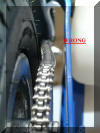
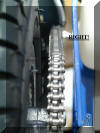
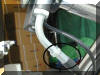
When making any adjustments to the chain it is very important to ensure the chain and sprockets are perfectly aligned. If they are not the chain will most certainly come off. To properly align the chain you must get your eye level with the chain. make sure that all components are aligned before tightening the fasteners. Click on the thumbnails to the right to see what the chain should and shouldn't look like.
|
 |
 |
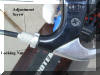
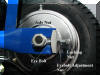 The rear tire held on by an axle and two locking eyebolts. To adjust the chain loosen the axle bolts and the locking nuts. Use the eyebolt adjustment nuts to tighten and align the rear tire. Once the chain is snug and straight tighten the axel nuts. Finally cinch down the locking nuts on the eyebolts. Refer to the picture on the right. The rear tire held on by an axle and two locking eyebolts. To adjust the chain loosen the axle bolts and the locking nuts. Use the eyebolt adjustment nuts to tighten and align the rear tire. Once the chain is snug and straight tighten the axel nuts. Finally cinch down the locking nuts on the eyebolts. Refer to the picture on the right.
 Sometimes it is difficult to get the chain straight due to the fact that the motor and rear wheel sprocket aren't aligned. If this occurs simply turn the scooter on it's side, loosen the three engine mounting bolts, and the engine can be easily slid to either side to compensate for any misalignment. Sometimes it is difficult to get the chain straight due to the fact that the motor and rear wheel sprocket aren't aligned. If this occurs simply turn the scooter on it's side, loosen the three engine mounting bolts, and the engine can be easily slid to either side to compensate for any misalignment.
|
| Tires |
|
 The tires on your gas scooter are pneumatic (air filled) tires. The tires require 85psi
and can be filled via the valve on
the side of the tire. It is very
important that the tires have the
proper inflation. Although the
scooter has been prepared to ride
once out of the box, due to long
shipping distances and elevation
changes we have yet to see one
scooter with the correct pressure
right out of the box. Low tire
pressure will make the scooter feel
sluggish and a loss of power will be
felt. The tires on your gas scooter are pneumatic (air filled) tires. The tires require 85psi
and can be filled via the valve on
the side of the tire. It is very
important that the tires have the
proper inflation. Although the
scooter has been prepared to ride
once out of the box, due to long
shipping distances and elevation
changes we have yet to see one
scooter with the correct pressure
right out of the box. Low tire
pressure will make the scooter feel
sluggish and a loss of power will be
felt.
Remember: 85psi
You will notice that the valve on the 22.5cc front tire is turned to the
side a little and is not straight out. This is intentional to keep the valve
from hitting the frame of the scooter as the wheel turns. If the valve is
not angled you will hear a clicking sound every time the tire makes a
rotation. To cure this, let all of the air out of the tire. Hold the tire
with one hand and the rim with the other. Twist the tire one way and the rim
the other. This will cause the tire to "slip" on the rim and make the valve
turn to one side. Once this is achieved refill the tire to 85psi.
|
| Throttle |
| There are two main types of
scooter throttles. One is a twist type, and the other is a hand throttle.
Although the throttles are different in operation, they are essentially
mechanically the same. When the rider applies the throttle, a cable carries
this motion down to the engine. For continued smooth operation it is
important to keep this cable clean and free of obstructions.
 Should the throttle begin to feel loose and sloppy, the slack can be adjusted on the cable at the handlebars. Simply loosen the lock nut and adjust the cable tension via the adjustment screw. Once the desired tension is achieved retighten the lock nut. Should the throttle begin to feel loose and sloppy, the slack can be adjusted on the cable at the handlebars. Simply loosen the lock nut and adjust the cable tension via the adjustment screw. Once the desired tension is achieved retighten the lock nut.
|
| Brakes |
 The brake on your gas scooter is a cable actuated drum brake. This style brake has proven well over time and is very simple to maintain. The rear brake has two main adjustments. The easiest of the two is the adjustment on the handbrake itself. This adjustment has two simple steps. To change the tension on the cable merely back off the locking nut and screw the adjustment screw in or out accordingly. Once the desired tension is achieved re tighten the locking nut. The brake on your gas scooter is a cable actuated drum brake. This style brake has proven well over time and is very simple to maintain. The rear brake has two main adjustments. The easiest of the two is the adjustment on the handbrake itself. This adjustment has two simple steps. To change the tension on the cable merely back off the locking nut and screw the adjustment screw in or out accordingly. Once the desired tension is achieved re tighten the locking nut.
 Further adjustment can be made at the brake drum itself. This task is easiest with two people. First, loosen the adjustment at the handlebar hand brake and screw it all the way in . Next go to the rear brake and loosen the Cable Clamp. Once loose, pull back on the cable and have the second person push forward on the Brake Cable Lever (push hard, you are pushing against a tight spring action). While pushing the lever forward and pulling the cable back, quickly tighten the cable clamp. Additional minor adjustments can be made where the cable meets the rear brake. Further adjustment can be made at the brake drum itself. This task is easiest with two people. First, loosen the adjustment at the handlebar hand brake and screw it all the way in . Next go to the rear brake and loosen the Cable Clamp. Once loose, pull back on the cable and have the second person push forward on the Brake Cable Lever (push hard, you are pushing against a tight spring action). While pushing the lever forward and pulling the cable back, quickly tighten the cable clamp. Additional minor adjustments can be made where the cable meets the rear brake.
|
|
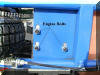
Carburetor |
| The carburetor has many adjustments on it and it
is recommended that these adjustments be made by experienced persons only,
however we will point out the major points. The carburetor is responsible
for pumping the fuel and mixing it with the air at a precise measurement.
The carburetor does this with very small diaphragms, orifices and ports,
which are easily clogged by contaminants. This is why is is extremely
important that you use only clean new fuel in your gas scooter.
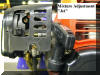
CHOKE
 First, the choke. There is a choke lever on the side of the motor as pictured on the right. Some scooters have "off" written at the top, and "on" written at the bottom. This is incorrect and I don't know how they screwed that
up.. The correct position of the choke is: First, the choke. There is a choke lever on the side of the motor as pictured on the right. Some scooters have "off" written at the top, and "on" written at the bottom. This is incorrect and I don't know how they screwed that
up.. The correct position of the choke is:
UP - CHOKE IS ON
DOWN - CHOKE IS OFF
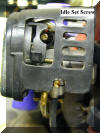
Primer
 When the scooter is brand new, been run out of gas, been sitting
for a long period or is very cold, it may be necessary to prime the
carburetor before attempting to start it. This is accomplished with the
primer pump bowl located at the bottom of the carburetor. Simply press and
release this pump several times until gas can be seen flowing through the
clear gas return line to the fuel tank. This will help start the scooter
under the aforementioned conditions, however if this is done once the
scooter has warmed up it may induce flooding.. When the scooter is brand new, been run out of gas, been sitting
for a long period or is very cold, it may be necessary to prime the
carburetor before attempting to start it. This is accomplished with the
primer pump bowl located at the bottom of the carburetor. Simply press and
release this pump several times until gas can be seen flowing through the
clear gas return line to the fuel tank. This will help start the scooter
under the aforementioned conditions, however if this is done once the
scooter has warmed up it may induce flooding..
JET
 Due to the fact that the carburetor mixes the fuel and air at an exact ratio, elevation, temperature, humidity and other weather related variables can have a detrimental effect on your scooter's performance. The manufacturer pre-adjusts your scooter at near sea level and depending where you live your scooter may require adjustment. The adjustment screw, or "jet", can be located in the access hole just to the right of the choke lever. Turning the screw clockwise will lean the mixture while turning the screw counterclockwise will richen the mixture. It is recommended that the jet be adjusted no more then ⅛ turn at a time. Test
the scooter between turns and once peak performance we achieved we recommend
richening the adjustment an ⅛ turn. This is due to the fact that the leaner the engine is run, the hotter it will get, and this can induce a possible seizure of the engine from overheating. Due to the fact that the carburetor mixes the fuel and air at an exact ratio, elevation, temperature, humidity and other weather related variables can have a detrimental effect on your scooter's performance. The manufacturer pre-adjusts your scooter at near sea level and depending where you live your scooter may require adjustment. The adjustment screw, or "jet", can be located in the access hole just to the right of the choke lever. Turning the screw clockwise will lean the mixture while turning the screw counterclockwise will richen the mixture. It is recommended that the jet be adjusted no more then ⅛ turn at a time. Test
the scooter between turns and once peak performance we achieved we recommend
richening the adjustment an ⅛ turn. This is due to the fact that the leaner the engine is run, the hotter it will get, and this can induce a possible seizure of the engine from overheating.
IDLE
 If the scooter will not idle or idles too fast, an adjustment screw is provided next to the choke. Turning this screw clockwise will increase the idle speed. Turning the screw counterclockwise will decrease the idle speed. Remember that an idle speed that is too fast can be dangerous. If the scooter will not idle or idles too fast, an adjustment screw is provided next to the choke. Turning this screw clockwise will increase the idle speed. Turning the screw counterclockwise will decrease the idle speed. Remember that an idle speed that is too fast can be dangerous.
|
|
The following wiring diagram was
recreated from the 'manual' that comes
with the razorback gas scooters. This
diagram is intended as a reference only
- it may not directly apply to your
particular model.
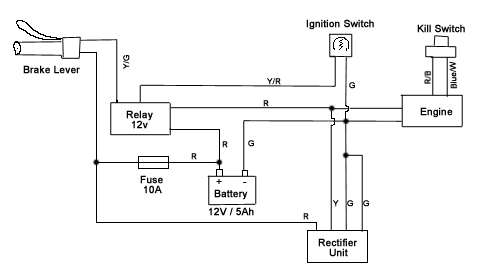
This wiring diagram
image is copyrighted and may not be
republished without prior written
consent. However, you may print a hard
copy of this image for personal use. |
|
|
|
* Free shipping only applies to the continental
United States.
| Maintenance |
Tech Support |
Customer Service |Terms of Sale| Affiliates |
Site Map |
|
Electric Scooter Comparison
Chart | Gas Scooter Comparison
Chart |
Copyright
Љ2008-2009 - All Rights Reserved
Scooters, Scooter Helmets, Gas Scooters, Electric Scooters
You Can Reach Us At 925-586-0322
Neo Scooters is a Division of Tiger Motion, Inc. (TM)
|